Home-made Almond Milk

The thing that never fails to elicit either a quizzical glance or a curious question is when I tell someone that I make my own almond milk.

I’m not exactly sure why this always takes people by surprise, but I suspect it has something to do with the fact that the things we buy in the store, the things that come already made for us, are complete mysteries to us.  I mean, how many of you already buy almond milk at your grocery store?  Or coconut milk?  Or almond butter?  Or any number of other products.   We buy them on autopilot, because the food industry has succeeded in making us believe that those unpronounceable ingredients on the back of the package are somehow necessary to make that product.

So I think when someone hears that I make almond milk, it’s jarring.  I can usually see the emotions and thoughts flit across their face–amusement then confusion then some brief thoughts of “She’s fallen off the edge,” and then, finally, genuine interest–all culminating in the question:  How?

And my answer is always: “It’s the easiest thing in the world!”  That’s not even a little bit of a lie.  In fact, the directions boil down to three steps:

Step 1:  Soak.
Step 2: Blend.
Step 3: Strain.

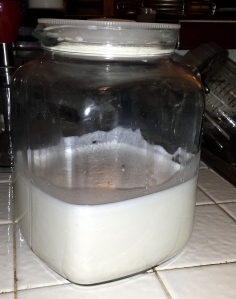
Really, that’s all it takes.  And the result is a slightly sweet, not as thick, more almond-flavored, light-feeling beverage.  I go with unsweetened because I usually end up using it in recipes where I want to tailor the flavor a little more, but you could absolutely add a date, sugar, vanilla, or any other number of flavorings to the blender to sweeten it.

Home-made Almond Milk
Makes about 6 1/2 cup servings

20140121_220607

Ingredients:

1.5 cups almonds
3.5 cups water
Small bowl with a lid
1 air-tight container
Cheesecloth or a nut milk bag
One medium or large strainer
A blender
Optional flavorings: date, sugar, cinnamon, vanilla extract

Directions:

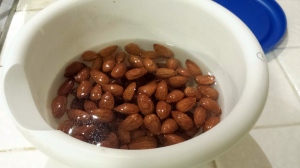
1.  Put the almonds in the small bowl, and fill with water until the almonds are covered.  Put the lid on, and let the almonds sit (on your countertop is fine) at least overnight.  The longer you let them sit, the creamier your milk will be.  I have let them sit for 2 days, but I probably would not exceed that.
20140124_200715
2.  Pour the almonds into your strainer to get rid of the old water (thought you were gonna drink that, didn’t you?).  Put the strained almonds into the blender.  Add the 3.5 cups of fresh, filtered water.  Add any flavorings you want.  Blend for about 5 minutes.
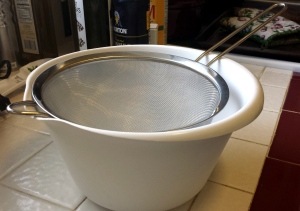
3.  While it’s blending, set up your squeeze station.  I balance the strainer into a bowl like so:

20140124_161609

 Then, line the inside of the strainer with the cheesecloth.  The strainer will do the job of sifting through the almond pieces, but you’ll want to cheesecloth so you can take out the drained mixture and squeeze the hell out of it.
4.  Pour the blended almonds into the strainer.  If your strainer is big enough, you could pour the whole thing in and let gravity do the work.  If it’s not, you can do as I do and pour in a little bit at a time, let it sit, and then press down on the mixture with a spatula when I get impatient.
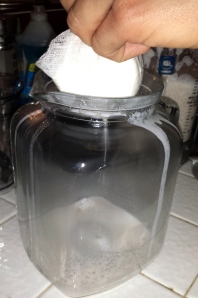
5.  At some point, the dripping will start to slow down as the almond meal starts to clog the pipeline.  That’s when you do this:

20140121_215532

Take the cheesecloth out of the strainer, wrap everything up so no almond milk will spill out of the open sides, and use whatever amount of muscle you may have to squeeze the life out those poor little almonds.  Voila, almond milk!
6.  OPTIONAL:  if you have any moral qualms about discarding all the leftover almond bits, you can repurpose them and make almond meal!  Just preheat your oven to 200 degrees, spread the mixture out on a baking sheet, bake for about 2 hours until dried out, and then pulse it in a food processor for a little bit.  This can replace flours in baked goods or bread crumbs in pretty much any other dish!
Couples’ Night In: Brunch Edition

When I did the super-restricted diet last year, it was pretty impossible to go out to eat.  I thought I would lament the loss of that ritual, but it turned out that eating out quickly became very unappealing to me.  The expense, the not-knowing-what’s-in-my-food, the fact that I was now good enough at cooking to be able to make better versions of whatever-I-was-overpaying-for at home all added up to me being not that interested in going out for dinner.

This, however, put a major crimp in my social life.  It turns out that finding things to do with friends that doesn’t involve drinking or happy hours or going out to eat requires some creativity.  For awhile, we tried to do “activities,” like paddling on the lake or hiking on the weekends. But activities require time and a lot of planning and coordinating and effort.

And, so, Couples’ Nights were born.  About once a month, Mr. Little Fish and I get together with our friends K & M to make a homemade meal together.  We alternate houses so that no one is stuck hosting every single time, and we split the cost of groceries.  We usually pick a “theme” to the night and then pick out a couple recipes in advance.

Our first meal was bbq pork ribs with grilled brussel sprouts and mashed cauliflower.  For dessert, we had a flourless chocolate cake.  Our second couples’ night was pizza night, where we made whole wheat pizza crusts and cut a whole bunch of toppings for each person to decide what they wanted on their pizza.  Dessert was a blackberry pear grain-free crumble.

Our third Couples’ Night turned into Couples’ Sunday Brunch.  We decided to be ambitious and made a brunch inspired by the Steeping Room’s Gravlax and Latkes.  So we made giant potato latkes topped with creme fraiche, smoked salmon, and a warm berry compote with a grapefruit mint salad on the side. Oh and mimosas, of course.

Image

It turned out to be spectacular.  Mr. Little FIsh’s ever-eloquent review was, “Yummy yummy in my tummy,” which, from him, is truly the highest of praises.

The meal came out to less than $5 per person, whereas the same meal would have run us $11 pp not including tax, tip, or drinks at Steeping Room.  It took enough time that we ended up having smoothies to tide ourselves over, but that’s because we took teaching breaks where I would explain how and why things work the way they do in the kitchen to K & M, who are relatively new to cooking but are avid students.  I think we all left the meal feeling pretty inspired that day.  =)

Home-made Gravlax and Latkes with Warm Berry Compote
Adapted from the Smitten Kitchen cookbook.  
Serves 8

This slideshow requires JavaScript.

Ingredients:

For the Latkes:                                                                       
2 lbs Russet potatoes, washed and peeled
2 medium white onions
1/2 cup all-purpose flour
2 tsp baking powder
1.5 tsps kosher salt
1/2 tsp ground black pepper
2 large eggs
Coconut oil, for frying
Creme fraiche or sour cream
12-16 oz smoked salmon

For the berry compote:
1 bag frozen mixed berries
1/3 cup white sugar
2 tsps fresh lemon juice
1 pinch salt
2 tbsps unsalted butter, room temperature

Directions:

1.  Preheat oven to 250 degrees, line a baking sheet with foil, and put it in the oven until needed.  This is where you will store latkes as they are cooked so that they don’t get cold.
2.  Using the shredding blade on your food processor, shred the potatoes and onion.
3.  Transfer the mixture onto a cheese cloth, and wring/squeeze out as much water as possible.  You do this to aid the browning process, so you get crispy potatoes instead of wilted, steamed ones.
4.  In a large bowl, whisk together the flour, baking powder, salt, pepper, and eggs.  If this looks a little thick, don’t worry–it will thin out in with the moisture from the potatoes.  Stir in the wrung-out potato mixture until everything is evenly coated.
5.  Form the potato mixture into 8 balls, and set aside.
6.  In a small cast-iron skillet, heat 2 tbsps of coconut oil over medium heat until it shimmers.  Drop one of the potato balls into the skillet, and flatten it into a 5-inch diameter pancake with the back of a spoon.
7.  Cook the latke over medium heat about 3-5 minutes on each side, until edges are golden brown. (While my pan was still heating, the first couple latkes took a little longer, but by the end, the time was down to 3 minutes each side.)
8.  Transfer each latke to the baking sheet in the oven and repeat process with each of the remaining potato balls, adding more oil in between each ball so as not to burn.
9.  Around the 4 or 5 latke, start to make your berry compote.  In a large saucepan, bring 1/4 cup water and 1/3 cup sugar to a boil over medium heat, stirring frequently to dissolve the sugar.
10.  Cook for 2 minutes, then add the frozen berries, lemon juice, and salt.
11.  When the mixture returns to a boil, add the butter and swirl it around so it melts.  Lower the temperature to low.
12.  Get out the number of plates you will be serving, and put one latke on each one.  Top the latke with a dollop of creme fraiche, and lay out about 2 oz of smoked salmon on top of the creme.  Then, either spoon the berry mixture over the salmon, or bring the berries to the table for each person to serve themselves.  Serve with Mint Grapefruit Salad* on the side or eat by themselves!

*I made these modifications to reduce the sugar content on the salad: 1/3–>1/4 cup fresh mint; 1 tbsp sugar–>2 tsp sugar; and 3 tbsps honey–>2 tbsp honey.

Green Smoothie and Ham

His and her smoothies (mine is the one with the greens).

I thought I would begin my recipe-sharing the way I begin every single day: with breakfast.

Specifically, by discussing my approach to breakfast.  I used to be very much Pro-Milk-and-Cereal.  I ate cereal for breakfast every day growing up and throughout college.  In my last year of college, however, I read Michael Pollan’s “Omnivore’s Dilemma,” and the one thing that truly stuck with me was his advice to shop around the perimeter of the supermarket.  After all, that’s where all the fresh/frozen/refrigerated foods are.  In other words, real foods.  The types of food that don’t need to advertise how they are good for you because they just are.  This is in stark contrast to my beloved cereal boxes, which are chock full of claims of wholesomeness like, “Now with fiber!”  You know what else has fiber?  Fruits.  Vegetables.  Food.

So, when I started law school, I began to rethink my breakfast plans.  Unfortunately, I had a…thing about eggs for a very long time.  I could eat them for a day or two, but after that, I would just get so tired of them.  Because I was also in the middle of my sugar addiction at the time, that meant that I always tended towards sweet breakfasts.  I could eat me some waffles (never been a big fan of pancakes, except my mom’s banana chocolate chip ones) and french toast like nobody’s business.  Of course, those things were typically reserved for weekend brunches, but my weekdays had to stay in the “sweet” category for me to feel satiated.  So, I spent about 3 months having a giant fruit smoothie for breakfast every day.  Sometimes I would make oatmeal, but mostly it was smoothies, with some “grown up” cereal in between (bye bye Reese’s Puffs).

My weight loss journey that started at the end of law school, however, seriously reset my sweet cravings and gave me a newfound appreciation for eggs.  And so I learned balance.  My current approach to breakfast, therefore, is now to rotate breakfasts on a weekly basis.  For example, one week I will decide that I am going to do eggs, so I will cook two sunny side up eggs every morning and eat them either on top of veggies or with turkey bacon.  The next week, I’ll have smoked salmon on cottage cheese with cherry tomatoes and red onion.  The week after that I’ll decide I’m craving something sweeter so it will be smoothie week (with greens in them).  And then finally, because one of the things I can’t give up for Paleo is oatmeal but unfortunately grains do contribute to weight gain a little bit for me, I’ll do a week of grains every once in a while.  The key for me for breakfasts is finding which combinations of foods keep me full until lunch.

And so, this week was smoothie week.  I have a couple general rules when it comes to my smoothie-making:

1.  Blend liquids with greens first.  There’s nothing worse than biting into a piece of celery that didn’t blend well enough.  So before adding in all the other fruits, I make sure the greens are very well-blended.

IMG_6682

2.  Make sure one of your fruits is frozen, so you don’t have to add ice in addition.  I get brain-freeze easily, so I don’t like my smoothies too cold.  If you do, you can always add the ice.

3.  Put some sort of protein source in there to keep you full longer.  This can include liquid egg whites, full-fat Greek yogurt, or cottage cheese.  Cottage cheese really thickens it up, so it can come down to a textural preference for you.

4.  Put a healthy fat to also keep you full longer.  Good sources: coconut butter or oil, avocado, and nut butters.

This week was a special smoothie week because it also happened to be the week that I made a smoothie, with greens no less, that not only was my own concoction but that I also really really liked.  I know, a smoothie hardly qualifies as a “recipe,” but although most of my smoothies tend to be good in that they taste like fruits, they aren’t ever anything I would, say, offer a guest.  This is one of the first smoothies I’ve made that was so delicious, I was compelled to immediately write down how I made it.  And if you are skeptical about putting greens in your smoothie (which, to be fair, so was I until I tried it), it is a perfect introduction.  And so, without further ado:

Tropical Green Smoothie
Serves 1

IMG_6685

Ingredients:

1/2 cup unsweetened almond milk (store-bought or homemade)
1/4 cup fresh orange juice
1/4 cup Greek yogurt
1/2 cup frozen mango pieces
1/2 banana
1 stalk celery
3/4 cup spinach
2 tbsp melted coconut butter (optional) (RECOMMENDED: how to make your own)

Directions:

Blend almond milk, orange juice, yogurt, coconut butter, celery, and spinach until smooth.  Add mango pieces and banana and blend until smooth.

NOTE:  On days where I have a smoothie for breakfast, I don’t eat fruit for any snacks during the day to manage the sugars.  Balance, friends, balance.